- LA SOBREMESA
- Posts
- #4 When You’re Cooking Paella Abroad, This Might Be Your Best Bet
#4 When You’re Cooking Paella Abroad, This Might Be Your Best Bet
Choosing the right rice for paella gets tricky when you’re far from home. Here’s what I learned the hard way.
Guillermo Varela de Limia
May 26, 2025
Couple of days ago, in Vienna, I came across a bag of “Arroz Cebolla” from the brand Arroz Tomás. Bright red packaging, a photo of a slightly over-the-top seafood paella, and “SOLLANA” printed in big bold letters on the front (Sollana is a village known in the area for producing quality rice for paella).
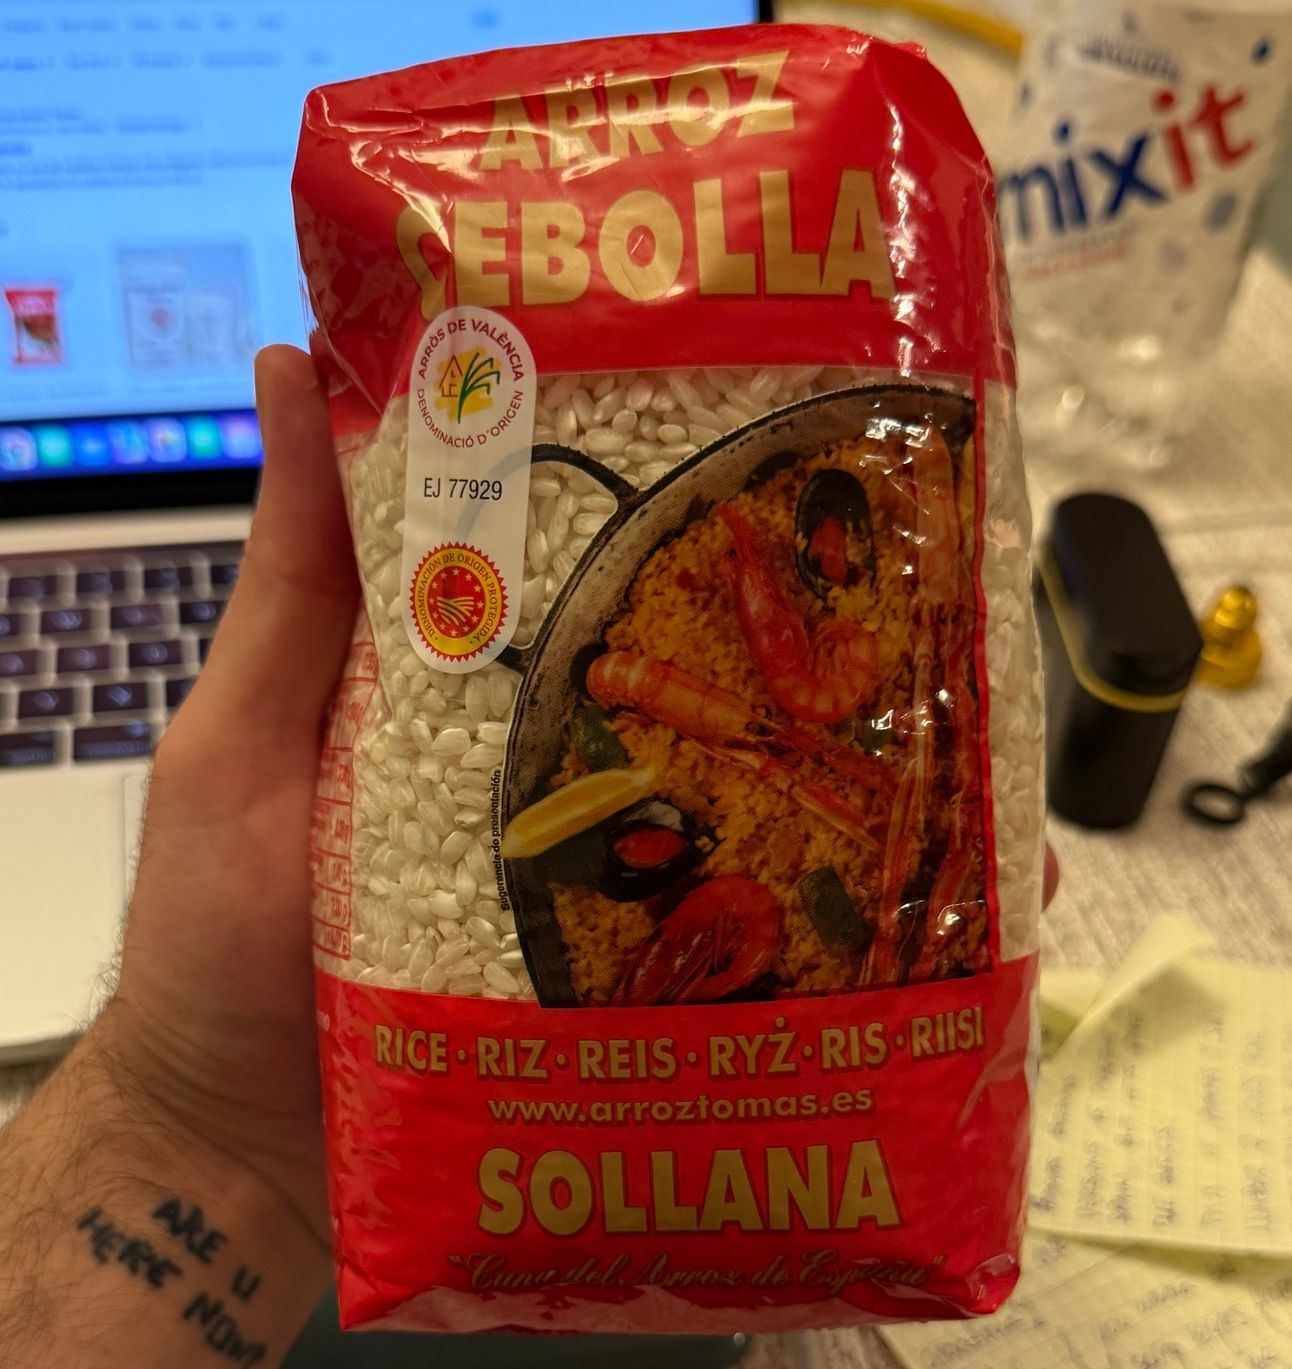
But most importantly: A big Denomination of Origin seal to prove it’s legit Valencian rice. I had never heard of that variety before… So I did a quick research on the internet. Most of the time, this is more than enough. But with this arroz cebolla from Sollana, all I could find is a really old website with not so much information. So I had to ask for advice.
I posted a story asking if anyone from my community on IG knew this rice, just to get some opinions and tips on how to use it for paella. And the entire spanish side of my community basically confirmed what I suspected — nobody had ever heard of this rice.
These are some of the messages I got:
- My grandma is literally from Sollana and we’ve never seen that rice in our lives.
- I work making paellas in Valencia, and never heard of this arroz cebolla.
But then, the other half of my DMs came in.
People from the US, Australia, the UK, Austria, Germany, Ireland, Poland and Switzerland told me that they had seen that before, and many of them already had experience using it.
- I cannot find anything else.
- I’ve seen it in some supermarkets in NYC.
- It’s not bad… Definitely the closest to ‘‘arroz bomba’’ you can find here.
- It’s good for paella! Almost all spanish restaurants here in the US use that ‘‘arroz cebolla’’.
And then, the right person came to confirm what I was already suspecting.
Omar Allibhoy, a chef based in the UK, but known all over the globe as ‘‘The Spanish Chef’’, with some pretty interesting books on Spanish Gastronomy, and a mastery of cooking spanish style outside of Spain, told me this:
I have used it a lot. They exported many tons to the UK in the last years. It releases a lot of starch and too much amylopectin. But when you’re playing away from home… you take what you get your hands on.
I don’t think anyone could have put it better. When you are playing away from home, it’s always complicated.
And when talking about spanish gastronomy…. it gets even more difficult 😅
But instead of complaining and getting nostalgic, let’s define what’s the right rice for paella, and what options should we try with if we can’t find the desired ‘‘arroz bomba’’.
What’s the right rice for paella?
Short answer? A round grain rice that can absorb lots of broth without bursting.
Long answer? It depends on what you’ve got around.
In Spain, it’s easy: bomba, sénia, albufera… take your pick.
But abroad? Supermarkets are packed with basmati, jasmine, weird long grains… but almost nothing close to what we’d use in a proper paella.
So I get it. I get the expat cooks clinging to whatever works. Even if it’s a rice that no one in Sollana has ever seen on their shelves.
And at the end of the day, it’s not about whether your rice comes with a fancy name or if your abuela gave it her blessing.
What matters is:
Does it absorb flavor well?
Does it stay al dente, not mushy?
Then go for it. Just avoid long grain rice. They wont do the job. Focus on finding rounded grain rice for this dish, like… risotto rice?
I haven’t tried yet, but some followers confirmed that using an arborio rice (the typical one sold as ‘‘risotto rice’’) gave them pretty decent results on paella.
We have to admit this… our Italian friends have done a better job than us… and there is not a single country in this world where you can not find a decent rice to make risotto.
So yeah, if you can’t find arroz bomba, and you’re unlucky to live in a place where Arroz Tomás hasn’t taken over the market yet with its arroz cebolla… just grab that risotto rice and fake it ‘til you make it.
The paella police are not gonna knock on your door. I hope.
RECIPE OF THE WEEK
BURNT BASQUE CHEESECAKE
This isn’t La Viña’s cheesecake, first of all. I know La Viña is great, and I admire the influence they reached from their tiny restaurant in the old town of San Sebastian.
But this is my version of this Basque Style cheesecake. In Spain, many chefs have taken this concept to a more interesting level, using more complex cheeses to spice up the result.
One important part is defining which cheeses are you using, and getting good quality eggs and cream. But it is also essential to understand how to bake it properly. We want a slightly ‘‘burnt’’ -not really burnt… but caramelised and toasted to perfection- crust on top, but preserve a melty smooth heart inside.
Ingredients for a mold of 23cm:
500 g cream cheese
100 g cottage cheese (or ricotta, or queso fresco)
40 g blue cheese
40 g parmesan
180 g sugar
250 g heavy cream (35% fat or more)
5 fresh eggs
(optional if you don’t care about gluten) 1 tbsp of flour
100 g of biscuits
60 g of butter
Method
Start by preheating the oven to 190°C/375°F.
The first step is making the base, which btw is completely optional and actually purists may not even approve, but I find it convenient to serve later.
Blend the biscuits, melt the butter and mix until crumbly. Place it as a base in the mold, previously covered with baking paper, and press it down well to keep the base from falling apart later.
Drop it in the oven for around 5-10 minutes to get it extra crispy
In the meanwhile, prepare the batter in two times:
First, use a blender to process all the cheeses together with the sugar. This last ingredient will draw out moisture from the cheeses, and make this step easier. You should get a smooth paste.
Then, use a whisk while adding the eggs and the cream. Once homogenised, add the tablespoon of flour and whisk again.
Strain the batter before transferring it to the mold, to get rid of lumps and any bubbles.
For the baking:
First baking: 190°C/270°F for 35' minutes
Then, take the cake out of the oven and switch to grill mode. Put it back in once the oven is preheated.
Second baking: Grill mode and 250°C. For exactly 3 minutes and 20 seconds in my case.
Remember all times and temperatures depend directly on the quality or power of your oven. These are the times I used for the melty result I was looking for (feel free to try different things depending on what you want to achieve)
That’s the magic of this cheesecake — humble ingredients, slightly burnt edges, and a soft, almost emotional center.
Reply